Wonderflex Quon's Vest, Part 1
By Foayasha
Important: I didn't make any changes to the original version of this "WIP/Tutorial", and I know it is only the first portion. This particular portion of the tutorial covers the initial steps that I did to make Quon's vest, and aren't specific to Wonderflex alone. Sorry towards the end I didn't add many pictures, I'll revamp this tutorial eventually. Luckily, I had taken all of the pictures to complete the second portion, which covers Quon's Vest and some Corgi Armor, so I'll get that up sometime in the next month. Thanks!
Working with Wonderflex
Where to begin, there is just so much to go over. I’ll try to break it down.
So… both Wonderflex and Friendly Plastic are polymer plastics, that when heated can be molded into different shapes. I haven’t done too many projects with either, but I gained a ton of knowledge from the 1 project I did tackle using these materials. For a while I had my sights set on cosplaying Quon Kisaragi, from RahXephon. Her outfit is fairly simple, an A-Line mini-dress, with some poufy sleeves, a pink braided wig, and a few different nick-knacks. The main thing that really makes this cosplay epic is her Life Module.

Figure 1: Quon's Vest: That shit is solid... (AN: I say dumb things sometimes)

Figure 2: My First Attempt, using duct tape and craftfoam.
The Quon Life Module vest is a full vest, fitted, with a zipper in front, which will hold its shape when not worn. It was as daunting project because it is a single piece, without seams, which would need to fit me. I would need to add a functional zipper to the front, and be flexible enough to take on and off.
I was thinking initially to make it out of paper-mache, but figure it would crack and break too easily. Making this thing out of fabric, in most cases, would not give the desired effect. I tried out some other options, such as duct-tape covered with gesso, and craft foam, but I was disappointed with them in the end. Neither were long term solutions, and I wanted this cosplay to stick around for the long haul.
Enter Wonderflex.
I did a bit of research, and found that Wonderflex might be able to do what I needed. First off, it is kind of expensive. Though, when I look back on it, it isn’t any more expensive than other cosplays I have done. And it gets the job done. I don’t know what is the best way to break this down, with a numbered outline, so instead I’ll just try to label each section so you have a little bit of a judge as for the order in which I did stuff.
Step 1 – Making a Body Form

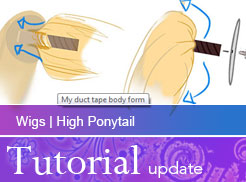
Figure 2: My duct tape body form
First thing I did before I took on this project, I made a Duct Tape body form (dress form). I love the duct-tape, let me tell ya. It was very simple, but a little time consuming. To create the form it took about 3 hours total, and about 3 large rolls of Duct Tape. There isn’t a lot to this process, but there are plenty of tutorials already out there for people to reference.
Basically, I had a friend come over, wrap up me up in tape, and cut me out of the form. I stuffed the duct-tape shell with plastic grocery bags, and then sealed it back up. Whatever you want to put in the form would work though, newspaper, fabric trimmings… however you want to do it. Just make sure you fill it securely, and then tape it up snug. When all is said and done, it should look something like this…
Note: If you’re a chic with an average build, and you want your form to have boobs, best wear a push-up bra. If you want your form for cross-play… don’t wear one. I have made several of these, and when you don’t wear a bra, you look like a flat chested little kid when its all over.
I used my dress form mainly for holding the vest as I created it, taping the different parts into place, for a decent judgment of where I wanted the thing to sit, and letting the Wonderflex cool. I’ll even say, I was even able to use the form a little bit for shaping the different pieces. It was just that durable. Just don’t use your heat gun directly on it… I suppose that is a given though, you’d melt it otherwise. For the Quon vest I ended up cutting the arms off, so if you are making a piece similar to mine, you might want to forfeit the arms like a typical dress form would be.
Step 2 – Cutting out your Wonderflex pattern
I am not very good at making patterns, pretty horrible to be honest. To create the pattern I wanted, taped craft foam onto myself… hey, don’t judge me >.> And adjusted and readjusted craft foam vest, until I got the exact shape I wanted. This means I was pulling the craft foam model on and off quite a bit. When the design was complete the shapes were not flat or easy to cut out. So I did have to make my best guess for what shape they needed to be on a flat surface.
Not only did I have the problem of figuring out the shapes of the vest on just a basic body, this vest had to have huge boobs. So I had a bit of a hard time trying to figure out what I was going to do for that problem. For the sake of creating the vest, I made all of the patterns as if they were flat, with the intention of cutting around the boob area, and making space. I will go over that portion in a bit.
Once I had the basic shapes I wanted I drafted them out on a piece of tracing-type paper. Since I wanted to give enough room for error, I exaggerated the length of almost everything I made. I was careful to make sure of each piece of Wonderflex though, as not to waste useful larger sections.
Something good to point out is when you get Wonderflex, it will look like a piece of poster board, and in most cases will roll flat when you untapped it. When it’s delievered, if it is hot outside (like it is in Texas), it may end up getting warm enough that it will stay coiled after it is delivered. For this reason, I would be careful about what projects you plan for the summer, as it might be a bit of a PITA to cut out your pattern from a rolled up piece of Wonderflex. Don’t let this completely deter you, the Wonderflex will still work just the same. For future reference though, if you know you will be doing a project where you need some Wonderflex, and it is still cool-ish outside, just order it and save yourself the hassle.
Step 3 – Creating the Vest Shape / Molding-Modeling the Wonderflex
Before I begin this section I need to explain a few things. First off, this vest I was making, I wanted it to have very smooth curves to it, and do my best to remove any seams. I didn’t get it perfect, but I am going to describe the methods I used, and how to accomplish what – I – did. There is a more reliable way to use Wonderflex, that I had not heard of yet; if I had, I may have done things differently.
The technique I read about AFTER I made my vest, was double layering the plastic, using a rolling pin to fuse 2 sheets together. This would make the plastic more durable, and it would hold its initial shape a bit better after heating. I did not do this, so I had some issues with heating the plastic, and having it collapse in on itself. Though, with the distortion-type technique I used, I am not sure if I could have accomplished the project with double layered plastic. Anyways… that is just FYI, for most armor pieces, which are a bit more flat, double layering is probably the way to go.
So now I have my shape, and I have taped it onto my dress form. All done right? Wrong. I am sure by this point you have probably read enough Wonderflex tutorials to know the types of things you might need, but just incase:
- Heat Gun – you can get one for 30 bucks at Home Depot or Lowes (can’t remember which).
- Ice – Fill up a bowl or cup with ice (freeze ice in a cup). This will help set the wonderflex faster, if you cool it with an ice bath.
- Old metal spoon - use this to merge the seams, by pressing the spoon along a hot seam and a hard surface.
- Wax Paper - Work with wonderflex on hard surfaces without worrying about the wonderflex melting to it (like countertops).
- Rag or Paper towel
- Leather Gloves
Remember that I left all sorts of extra room on the Wonderflex, well this gave me a ton of trouble when it came down to wearing the damn thing, which I needed to do, to verify that it fit right. Like I said, I wanted the vest to be fitted and I am terrible at making patterns.
One of the main problems I was running into was that the chest hadn’t been formed yet. Once I was certain I had cut out enough material to have space to make adjustments, I cut out the slits where I wanted the boobs to go. I had purchased an large egg shaped mold to help with this process (hey, it was Easter). I found that covering the mold with wax paper kept it from sticking to the plastic.
Note – Almost anything will stick to Wonderflex/FriendlyPlastic if it is hot enough. Wax/parchment paper was my solution for this. If I felt the Wonderflex would come into contact with something while I was forming it, and I didn’t want them to stick together, I would line it with wax paper first.
I cut some extra pieces of Wonderflex and fitted them into the holes I had made. Then the elbow grease came into play. I would heat the plastic, and then pull it down hard onto the mold. Sometimes I even used my knee, since I needed to hold it in place for several minutes. It really was a lot of repositioning and time to get the boobs shaped exactly how I wanted them.
Something you’ll notice when molding the plastic this way is that your perfect little form, it might not be the same shape when you are finished. As a matter of fact, I can say for certain it will be a different shape. This happens when distorting the plastic like I just described. To use the Wonderflex like this, it means you have to be willing to adjust the pattern at that point, so just be aware. I am an equal opportunity prop maker, and I was using everything in my apartment to get things the way I wanted. For the collar, I used a large glass candle holder, heated up the Wonderflex, and then molded it around the candle holder. I rolled down the edges to give it the rim.
I did end up needing to cut the Wonderflex a lot, overlapping additional plastic pieces for support or adding in extra pieces for more coverage, and tucking in pieces where there was too much material. This is fine though, because what Wonderflex adheres to the best is – other pieces of Wonderflex. If something doesn’t look right, don’t be too nervous if you need to make a cut. I did a LOT of this. It really was just a ton of trial and error with this thing, so I can’t stress that enough. If you are good at eyeing patterns, and math… stuff like that, then this won’t even be a problem for you!
Step 4 – Smoothing the seams.
So, after all the trial and error I just mentioned, there were a ton of seams I needed to smooth out. How did I do it? With a spoon…
Now comes in all the odd things I mentioned earlier. Heating up the Wonderflex would sometimes cause the thinner areas to warp as I was smoothing out the seams. So here is what I would do.
- For seams, I would heat up the Wonderflex, and then use a spoon and a hard surface to fuse the pieces together the best I could. Anything solid would work, but you need to be able to push the seams together, and then smooth them out.
- For small seams I would just heat the spoon up and then use that to melt the seams together. That way I could apply heat to a specific area, without the warping.
- To avoid the warping on larger areas, when I was done with a seam, I would soak the papertowel in ice water, and hold it in place over the Wonderflex, forcing it to cool faster. I would just model the plastic as it cooled to get it back to the original shape, or desired shape. ß biggest benefit I found so far. Sometimes I would even run the thing under cool water or toss it in the freezer. Whatever I could to cool it down faster. The cup of ice water was the fastest method I found. And from what I could tell, Wonderflex didn’t care about water at all. Or Friendly Plastic for that matter. So don’t be nervous.
- Leather gloves helped to hold the vest when it was hot, but to be honest.. I didn’t use them until I started using Friendly Plastic.
- I only heated up sections of the vest at 1 time. Heating up too much in the same area would distort the whole thing.
I kind of feel like I am cutting this portion short, but it will be on a per case basis. But it does work to just heat up the area, and then fuse.
For now I am going to end it. There is a quite a bit to write up with the second half of using Wonderflex, and that is where most of my photos are as well to show my progress. So hopefully by early next week I have that part to post as well.
Part 2 coming soon – Friendly Plastic & Painting (AN: damn, I'm mean... over 1 year later she prepares to update).
Thanks everyone!!
-foa