Return to Tutorials | Part 2 | Part 3
My Sintra Tutorial Part 1
By Foayasha
I have gotten a lot of questions about how I use this illusive material known as Expanded PVC Foam Board, which I just call Sintra (which is a brand of this product). I tend to talk a lot about the subject and just how much I really enjoy working with it. Because I want to be sharing this on Deviant Art, rather than on a blog, I’ll be breaking my tutorials down into sections.
These tutorials will not be going over use with any power tools, since I don’t have any. I will be doing everything by hand, using manual techniques. The only power tool I own is a small hand dremel which I don’t use often with the Sintra, except for drilling holds, etc.
Sintra: The Basics
Tools, Temperatures and Trimming
Before I begin, I want to start off by saying that Sintra, when heated, releases toxic fumes like many other plastic products. I do not recommend heating this product in an oven which is used to cook with, and also take care about heating it in doors in general. There are some methods you can find with good old Google, which describe ways to reduce the amount or potency of the fumes. But let it be known, you are working at your own risk with these fumes in your house.
Ok on to the fun stuff…
Choosing your Sintra

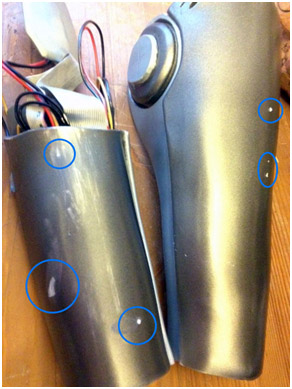
Figure 1: Lan Fan's Chipped Armor. Notice that the white plastic below shows easily when the paint is scratched or damaged.
Color:
These are the two issues you’ll be dealing with in choosing your Sintra. I’ve only ordered white and black in the past, but it does come in a variety of colors. This may be useful to some degree, but in most cases you’ll be covering the whole product in primer, so it will only matter if it gets chipped down past any paint or primer.
I began with sheets of Black Sintra, but by mistake I was sent a bunch of White on my last order. I originally thought it felt softer and easier to cut, which also translates to less stable and more flimsy. However, after looking it over, I retracted that thought. Even if it is easier to cut, the final product quality is still the same despite the difference in color.

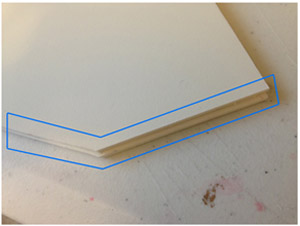
Figure 2: Uneven edges.
Size or Thicknesses:
I’ve worked with two thicknesses, and my main reasons are based on Cost. The thicker the Sintra, the more difficult it is to cut and the more expensive it is. And when I say difficult to cut, I mean it. It takes more than twice as long to cut ¼” Sintra, than it does 1/8” Sintra when cutting by hand. It also leaves a lot of room for error on edges, because as you are cutting there may be slants along the sides, which make it more difficult to line up layered pieces.
When you order your Sintra, from my experiences, I’ve needed to ask for my sheet of (4 x 8) to be trimmed down into four 2x4 sections, which are then shipped to me. In most cases, you may need to order more to make their “minimum price”. I’ve gotten my ordered, trimmed and shipped to me at an average cost of ~45.00 for a 4x8 sheet of 1/8 Sintra. You can get it cheaper than this, but with shipping included on such a large product, that isn’t too bad. And 4x8 lasts a while. You’ll need to work with your distributer on this to see what works best for you.
My Tools

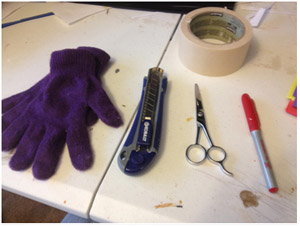
Figure 3: An example of the types of tools I keep on hand for working with Sintra.
The great thing about Sintra is that it tends to be a fairly self sufficient medium to work with. When I say that, I mean that you can get a finalized product with Sintra without using other overlays to get a smooth exterior (like gesso or friendly plastic). But you still need to have tools to work with the product, so here is what I normally keep on hand:
- Trimming Tools:
- Box Cutting Knifes – This is the heavy hitter when trimming the Sintra. Make sure to get something with a comfortable grip, as you’ll be applying a lot of bodyweight pressure on the blade during cutting, so the longer you can hold the knife, the better and cleaner your cuts will be.
- Stencil or Xacto Knife – For finer details on thinner sheets of Sintra.
- Scissors – I rarely use them, but on thinner sheets, it can be done.
- Replacement Blades – You will want replacements blades for all of the types of knifes you’re using. You want those blades to be very sharp, so make sure to be changing them out.
- Other:
- Craft Foam – For creating templates and trials. I don’t normally cut into the Sintra until I know the basic shape and size I need. Craft foam is very cheap, and plus it can be used for other things in a pinch.
- Masking Tape – It’s good to have around. Buy a couple rolls and use it as needed for quick fitting tests, and for masking off areas you don’t want damaged or painted over.
- Pencils & Sharpies – or anything to write with. Just make sure you can see it.
Temperatures for Sintra and Baking Prep
- Keep the Sintra at Room temperature for cutting (obviously).
- Molding Temperature ~ 200-225 degrees F
- Do I use a Heat Gun?
I normally go with about 220 with a standard household oven, but at this temperature you don’t burn the Sintra, and get nice even coverage. The Sintra should be malleable within a few minutes of placement in the heating unit.
Not really. I don’t like how heat guns give very uneven heat distribution. It is much easier to heat the pieces in an oven or heating unit. Heat guns are only used to locally modify a portion of an already molded piece. For when I don’t want to remold the entire piece, or if I have already assembled and want to modify a small portion of the piece I am working on.

Figure 4: Using a Heat Gun to Manually correct a warped piece of Sintra.
- Baking Supplies:
- Cookie Sheet – DO NOT use a cookie sheet you use to COOK with.
- Tin Foil – You can place it directly on the oven rack if you have a large piece, or you don’t have any spare cookie sheets.
- Gloves – For molding hot Sintra. You want something which still gives you a bit of dexterity, and doesn’t have any harsh seems. Sintra is very moldable when it is hot, so you can add finger prints, seam lines, and all sorts of other imprints. Make sure the gloves you pick will be the least damaging to hot Sintra.
- Oven Mitt – I don’t normally use one, because I wear the gloves when I am ready to work with the Sintra, but if you are pulling a cookie sheet out of the oven along with the Sintra piece, the gloves probably won’t be enough protection. You will need to change gloves very FAST to work with the Sintra while it is still warm.
- Can I heat more than one piece at a time?
Or
At these low temperatures the Sintra will not burn, even when left in the heating unit for an extended period of time, and will remain ready to be molded. So adding a few pieces of Sintra to the oven at one time isn’t going to hurt them, but it will release even more fumes. The same goes for large pieces of Sintra.
Trimming Sintra

Figure 5: Here's a few pics of me trimming down a large sheet of sintra.
- Measure out the size of Sintra you need for the item(s) you will be working on. If needed, transfer your templates onto the sheet for sizing. A 2x4 sheet is still pretty large, so you won’t want to cut out your pieces directly from it. If you’re piece is large, than make sure you have a large enough space to turn the sheet around for cutting.
- Locate the line where you need to score the Sintra. Using your box cutter, score the sheet once or twice, depending on the thickness and pressure applied.
- Turn the sheet over.
- Lightly bend the sheet against the score line.
- If the sheet has not broken, flatten out the Sintra, and rescore the sheet on the opposite side, along the original score line.
- Gently bend the sheet of Sintra again, along the score line.
- The sheet will snap in two clean pieces.
- Here is a full size image of this process.
Cutting Out Templates

Figure 6: Cutting out a template piece. Sorry the images are sort of blurry.
- Trace the patterns onto the sintra the best they will fit onto the sheet you’ve measured out.
- Using your box cutter place your non-dominate hand at the top of the sheet, with the blade in front – so that you are cutting away from your hand.
- Score several along the lines which you’ve drawn, being careful to be as accurate as possible. The cleaner the cuts are, the easier it will be to sand down the Sintra later.
- Once a fairly deep incision has been made, lightly bend the sheet at the cut so that it creates a slight crease.
- Turn the Sintra over and score along the line which was created from bending the Sintra.
- Bend along the incision line until the piece snaps.
- Afterwards I clean up any ragged edged – Be Careful!
- Here is a full size image of this process.
For thin pieces, just scoring may have been enough to cut through the sheet of plastic. However, if you are using a thicker sheet, or maybe the line is shorter or curved, so you can’t cut as deep as easily:
And that’s it for the basics!! Next I’ll be going over how I fuse together the pieces which were cut out, molding them with heat, and how I pretty them up!
Return to Tutorials | Part 2 | Part 3


