Return to Tutorials | Part 1 | Part 3
My Sintra Tutorial Part 2
By Foayasha
A continuation of my first tutorial which covered the very basics of using Sintra. Maybe I’m breaking this down too much, but for those who will read it, I hope it will give them more than enough information to begin working with the material.
Sintra: Fusing, Mold and Sanding
The wonders of Cyanoacrylate and Plastic.
Again - Before I start, I want to say that Sintra, when heated, releases toxic fumes like many other plastic products. I do not recommend heating this product in an oven which is used to cook with, and also take care about heating it in doors in general. There are some methods you can find with good old Google, which describe ways to reduce the amount or potency of the fumes. But let it be known, you are working at your own risk with these fumes in your house.
Choosing your Adhesive
So now that I’ve covered the basics, I’ll get into the good stuff. How I go about molding and finishing off my Sintra props. The main component for me, while working with plastics such as Sintra or styrene brands, is Cyanoacrylate: SuperGlue. The brand I prefer is Loctite, but that is only because it is easy for me to get, and I can find it easily in a 20g bottle for about 5 dollars. This is a good deal, when a single dollar only buys you .7g of other brands if you purchase those tincy little bottles.

Figure 1: Different name brands of Super Glue.
So some of you may wonder if I’m crazy and how I am able to use superglue to really achieve the final results that you’ve seen in my props. Well I’m going to give you the quick rundown of the sciences behind it. Cyanoacrylate cures nearly instantly the moment in comes in contact with a moist surface. Wonderful right? As almost all surfaces will have at least a very trace amount of water on them. This goes double for plastic, as it not only cures and adheres strongly to the surface of plastic, but it also creates a chemical reaction which will bond two pieces of plastic together quite thoroughly. The bond which is created is actually much stronger than the original material, as the glue adds additional hardened support to the porous material. Great isn’t it?
What exactly does all of this mean for working with Sintra? What it means is that when you superglue two pieces of plastic together, they create a bond which has more strength than the base material: ie, the bare Sintra is more likely to tear or crack, than break at the point where you glued the two pieces of material together. Of course, this will all depend on where you are gluing the material together, and how much you use, etc, but just know it is the BEST adhesive when working with Sintra. For more details on Cyanoacrylate, including how to clean it up, check out these two helpful links:
Sintra Adhesives
How Stuff Works: Superglue
Creating Lan Fan’s Shoulder
Well now I’ve let out my secret of prop making, mind blowing wasn’t it, I’ll finally get to the meat of this tutorial and describe my “techniques” when working with Sintra. For this tutorial I’ll be using my Shoulder pieces from my Lan Fan cosplay as the main example, filling in the blanks with a few other images when needed.
This portion of the tutorial is just to show my basic workflow, so I’ll only be detailing my step by step process and leaving out what I do when I run into kinks, or when more detailed steps are required. More details will follow!

Figure 2: Lan Fan's Automail Shoulder Armor.
Above is an example of the armor piece I wanted to create. I thought this would be a good example, as I need to mold the pieces, and also created the trim, which I interpret as a slightly raised edge. This will also require the painting and polishing as the rest of the armor did (which will come a bit later in my "Painting Tips" tutorial.
This portion of the tutorial is just to show my basic workflow, so I’ll only be detailing my step by step process and leaving out what I do when I run into kinks, or when more detailed steps are required. More details will follow!
- Create your design for armor piece. For Lan Fan, I used craft foam to template out the design, and fit and trimmed the pieces as needed. I used a body form to make sure this would sit properly and the length was appropriate for the armor piece. (Figure 3)
- Transfer the designs onto the Sintra. For the shoulder, I copied the template twice, one for the base layer and the other for the trim. For this shoulder I made the trim ½ inch thick. (Figure 4)
- Using the methods I described in the first tutorial, cut the pieces from the Sintra sheet.
- Next it’s time to glue. Apply a line of glue around the edge of the piece where it needs to be glued. Since it dries quickly you need to be fast. For this piece, I applied the glue to the trim, rather than the base layer, so there would be less leaking. Also, it is only needed to apply glue to one surface, unlike some other glues which require both surfaces to be glued before adhering the two surfaces.
- Now that the trim has been secured, remove any excess overlapping Sintra.
- OPTIONAL: At this point if you have any significant bevel which would need to be applied, you would do that here. This can be completed with the box cutting knife or a dremel. Or sanding for hours on end… its up to you, but it will be easier to start the bevel before molding.
- Get the cookie or tin foil in place in the oven rack
- Prep the oven to 225 degrees.
- Put your armor pieces into the oven. For Lan Fan I prepped all 3 pieces of the shoulder at once.
- Put on your gloves now. When the Sintra has softened, ~3-5 minutes, remove (one) from the oven.
- Molding the Sintra….
- Using 60-80 grit sand paper, begin sanding along the edges of the trim, where the seams can be seen. Change direction frequently, as to help blend the seam together.
- Finish off seams and small gaps by applying a small amount of superglue along the edge. I use a worn piece of sand paper to first spread the superglue lightly, and then with a fresher piece I sand more rigorously to completely remove the seam. Also smooth out any other scratches and imperfections which need to be removed.
- Here is a full size image of this process.
- Sand further with 150 grit sand paper once you finish smoothing out seams and gaps in the trim. Sand down the rest of the surface of the armor as well, removing all of the rough surfaces created with the lower grit sand paper.
- Complete the sanding by following up with a few higher grit sand papers. I normally go 320 > 400 > 800.
- And you’ve completed a primer ready piece of armor.

Figure 3: Craftfoam Templates; Figure 4: Trace Patterns onto Sintra

Figure 5: Here the base piece of the shoulder and a trim piece have been cut out.

Figure 6: Applying the Glue
"What if the glue doesn't take initially?" This happens for me most when the sides of the sintra do not line up, whether it is because you are attempting to fuse at the thinnest edge, or if you are working with pieces which have already been molded. In cases like this, I have a few options.
First I sand down the edge a bit; this adds texture and brings up the fibers in the plastic, the glue will work on those quicker than with the tightly packed fibers inside the board. If that doesn't seem to work, next I shave down the edges clean, and try to fit the two pieces of sintra as closely together as possible. Having them line up better helps, because there is more coverage for the glue to do its magic. You can also try puncturing the sides which are being fused. Superglue likes porous surfaces.

Figure 7: Trimming down the uneven edges before the pieces are molded.
*Pro Tip* - When applying the glue, use a zigzag or “squiggle” type line, rather than dots or anything with light coverage. I made the mistake on Lan Fan’s armor pieces by applying dots in a line. When the plastic was heated, it created a rather bumpy edge which I had to sand out later.

Figure 8: Using a soft line is ok, but don't use dotted lines of glue for long edges - it warps the plastic easily when heated.
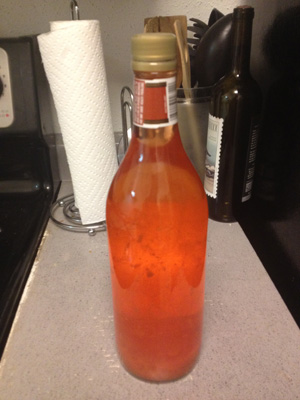
Figure 9: I used this bottle to mold the shoulder piece. This example only requred a simple mold, depending on the shape, more complete molds may be needed.
Ok a. few more details here, right! First of all, you want to know the shape you’re aiming for here. The shoulder piece I am working on is sort of a round boxy shape, which should snuggly fit over my arm. I also wanted the shoulder to be more round than boxy, so I settled on using a bottle which was a bit larger around than my arm (11” around).
I would love to be able to write down my specific instructions for how I mold each piece of Sintra, but that gets down to artist preference and eye/feel. So for this part it just seemed easier to show you, rather than to try and write it out, as I felt this would get lost in translation. So … go here for more details on the basic molding of the pauldron piece. Later in this tutorial I will go over this topic a bit more.
The final result of this process will depend on your particular need and desire to continue sanding. If removing the seam is not that important, you will not need to use this process for long. However, you can completely remove the seam by repeating this process as shown below.

Figure 10: The basic sanding process I take on all of my seams and edges which contain more than one layer of Sintra.

So at this point I’ve pretty much covered the basics of how I use Sintra. And using these steps I created my Lan Fan shoulder, as well as pretty much all of my other Sintra armor, such as Pandora, my upcoming Celestia armor and accessories, and a lot of the detailing on my Soul Eater Deathscythe. I know there are other things to learn when working with Sintra, but I want to leave you with a few final tips I’ve learned along the way which I think will help out.
Sanding to a clean line without using a body filler:
Most of the time when working with props a body filler, such as bondo is needed to really fill in those large gaps. However, with Sintra you can avoid that most of the time on a lot of different types of props depending on the gaps you create. Sometimes it is unavoidable at the time however, my Death Scythe being a good example, as I didn’t want to spend the time using this technique to fill in the gaps on the scythe, and opted for bondo to do the job for me.
- Locate your gap or hole which needs to be filled.
- Find a scrap piece of Sintra (I’m sure they are laying all over your floor and worktable by now!) and trim it to fit into the gap with a bit of overflow.
- Apply a small amount of superglue to the gap.
- Place the Sintra scrap into the gap.
- Once it has settled, begin to sand the scrap directly over the gap. Do this quickly as the shavings and dust of the Sintra will settle in the remainder of the gap and fill in the space.
- If needed repeat this process with more scraps until the base of the gap as been filled.
- Use the remainder of the dust from the Sintra to fill in the final spaces of the gap.
- Repeat the sand/glue process as needed until the gap has been completely filled and the seam has been cleaned away.

Figure 12: This shows some uneven edges and gaps in the corner of one of my automail pieces.

Figure 13:I didn't take pictures of this part, so here are some scraps from another picture I took. You'll see them everywhere, the thin sliver pieces work best.
WOOPS! I didn't get pictures of this part... well just be comforted that it is nearly identical to the image listed above. I'll grab pictures in the next week or so and update asap.
Things I use to Mold Sintra:
When I mold Sintra, sometimes I need to make a specific mold, however, most of the time I have things laying around the house to help me. So here’s what I’ve used in the past:

Figure 14: I like to think I'm an equal oppurtunity cosplayer, I don't descriminate against household items which can be used to my benefit.
Well I guess that covers it for the time being. I sort of thought there would be more to include, but really it is more a matter of feeling. I hope this does help and gives those who read it a few tips and hints as to how to go about their next project. If you have any questions feel free to ask me! Also stay tuned because I'll be doing a little tutorial on my process when painting these darn things!
Thanks everyone!!
-foa
Return to Tutorials | Part 1 | Part 3